Advertisement

Breadmaking machines
by Chris Woodford. Last updated: December 11, 2012.
Freshly made bread is the best thing
since—well, the best thing
since sliced bread! The only trouble is, it takes time and effort. Most
people have never made bread in their lives and would never dream of
doing so, but the recent invention of automatic breadmaking machines
has started to change all that. Now, millions are turning their
kitchens into bakeries and enjoy their own freshly baked loaf each day
at a fraction of the cost they'd pay in a store. What's the big
attraction of bread-making machines? What are they like and how exactly
do they work?
Photo: A typical electronic breadmaker. Unfortunately, this early model has an opaque lid so you can't watch the ingredients slowly transform into a delicious loaf, but most models now have glass lids so you can watch progress in real time. A glass lid means you can spot any problems and abort your baking session; with an opaque lid, you might have to wait five hours to discover that your loaf's a disaster (something a glass lid might have revealed several hours earlier).
How to make bread (the old way)

Bread is one of the world's oldest and most versatile foods. Just
think of all the different types of bread (everything from a basic
sliced white loaf to a really fantastic ciabatta or
foccacia) and all the different ways we use dough (from simple loaves to rolls and pizza
bases). Delicious!
Eating bread is an awful lot easier than making it—and that's
because bread-making is necessarily a time-consuming process. Even with
the help of an automatic breadmaker, it still takes several hours to
make a loaf because it takes that long for the yeast to do its job.
The basic process of making a loaf involves five distinct stages:
- Mixing: You take flour,
yeast, water, fat, sugar, and salt and mix them together to make dough.
- Kneading: You have to
beat and bash the dough around to make it stretchy and elastic. Without
kneading, your dough won't rise and you won't get a decent loaf.
- Rising: Now you leave
your dough in a warm place to rise for an hour or more. During this
stage, the yeast does its job. Air enters the mixture and makes the
dough plump up to about twice the size.
- Knocking down and proving:
Some bakers believe you should repeat the rising process a second time
to produce a more even loaf. First you bash the dough about to knock
the air out of it (which is called knocking down). Then you leave the dough
to rise a second time in a tin (which is called proving).
- Baking: Finally, you put
the dough in a tin, place the tin in your oven, and bake.
Photo: Making decent bread involves following a sequence of well-defined steps—and that's why a machine can do it just as well as a person. Top: Rolling out the dough and shaping it ready for baking. US Navy photo by Adam York. Bottom: Turning out finished, baked loaves from their tins. US Navy photo by Kyle D. Gahlau.
How a breadmaking machine works

Photo: Right: Looking straight down into the
breadmaker with the lid open. You can see it's really just a compact
oven. There are two heating elements at the side for baking the bread.
The round thing in the middle at the bottom is the electric motor that does the kneading.

The great thing about an automatic breadmaker is that it does all
these processes for you. A breadmaking machine is essentially a compact
electric oven that will hold a single, large bread tin. The tin is a bit special: it has an axle at the bottom that connects into an
electric motor underneath. A small metal paddle clicks onto the axle
inside the tin. The axle is held by a waterproof seal so none of your
bread mixture will escape.
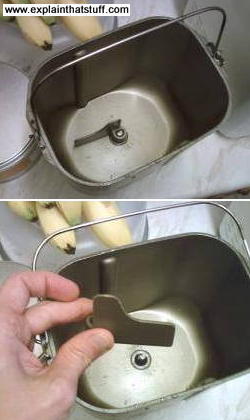
So how does it all work? First, you put your paddle in the tin. With
the tin out of the oven, you measure out your ingredients and load them
up. All you have to do then is pop your tin in the oven, select the
program you want using the electronic control panel, close the lid, and
wait. If your breadmaker has a glass lid, you can watch what it's
doing. If the lid is opaque, you'll have to listen and use your
imagination. One of the first things you'll hear is the machine's motor
whirring as the paddle spins round, kneading the dough.
Then everything will go quiet during the rising phase. Then you'll hear more
kneading and another period of quiet during the proving.
Finally, the oven will switch on, you'll see steam coming up through the exhaust vent, and you'll start to smell the
delicious aroma of baking bread a few minutes later. The basic
breadmaking process is largely automatic, but most
machines come with recipe books for making more advanced types of dough.
Photos: Left: Top: The kneading paddle in place at the bottom of the tin. Note how the tin has a useful wire handle so you can haul it up out of the machine while it's still hot. Bottom: What the kneading paddle looks like when you remove it. As this turns around at speed, it flings the dough around and kneads it.
Some breadmakers have other features, such as a built-in
memory so they can survive short power outages ("blackouts") of a few minutes: they remember what they were doing
and continue when the power returns. Most breadmaking machines also
have the ability to make a delayed start, so you can put the
ingredients in before you go to bed and wake up to a fresh-baked loaf
in the morning. (It's worth noting, however, that if you leave a loaf
in a hot machine after it's done it will go on cooking and the crust
will become noticeably harder—maybe to your taste, maybe not.)
What's inside a breadmaking machine?

Here's an illustration of one of Panasonic's original breadmaking machines (taken from what I believe is the earliest patent they filed
in the United States), which is very similar to the machine I've photographed for this article. What are all the bits and what do they do?
- Baking tin cover integrated into folding lid.
- Folding, hinged lid contains steam exhaust vent in the center.
- Exhaust port allows steam to escape from baking tin and flow out through lid.
- Air vent allows air into the dough to help it rise.
- Power supply lead.
- Hole where baking tin screws securely into place containing, at its center, the motorized axle that turns the kneading paddle.
- Plastic outer case insulates the oven and makes the breadmaker safe to touch during operation.
- Simple LCD display and wipe-clean touch-control panel.
- Recessed groove where the bottom of the lid locks in.
- Removable baking tin will bake a single loaf at a time.
- Detachable kneading paddle clicks onto an axle slotted through the center of the tin in a waterproof seal.
- Tongue around edge of lid fits securely into groove (9) in bottom part of machine to ensure heat is retained.
Artwork: Typical parts in a breadmaker, from US Patent 4,951,559: Bread Producing Machine filed on May 27, 1988 by Yuzuru Arao et al for Matsushita Electric Co (Panasonic) and granted in the United States on August 28, 1990. Artwork courtesy of US Patent and Trademark Office. There's lots more to a breadmaker than the bits you can actually see. If you're really interested in the technical specifics, do take a look at the original patent.
What kinds of bread can you make with a bread machine?

Most breadmakers have numerous different programs for making many
different kinds of loaf. You can make white bread, wholemeal, or
special loaves by using different kinds of flour and varying the
other ingredients.
Programming a breadmaker is a simple operation:
- Select the type of bread (basic, wholewheat, multigrain, French, or pizza).
- Select the bake mode (bake, bake rapid, sandwich, dough). This
varies the sequence of mixing, kneading, rising, and baking. For
example, in dough mode, the machine stops without actually cooking the
dough. At this point, you open up the lid, remove the dough, and then
take it out for your pizza, croissants, or whatever. (You have to bake
those in your oven, but the breadmaker helps you by preparing the
dough.)
- Select the size of loaf (large, medium, or small).
- Select the type of crust you want.
- Press the TIMER button. The display shows the total time the loaf will take to prepare and cook.
- Press the START button and the countdown to a delicious loaf begins!
When you're loaf is done (in anything from two to six hours), you
very carefully lift the lid, pull the hot tin out of the breadmaker's
oven, tip out the loaf, and let it cool down. All you have to do in the way of cleaning is wash out
the tin (which is helpfully nonstick) and the paddle—which takes about 30 seconds.
Photo: A typical breadmaker's electronic control panel and display. Using it is much simpler than it looks—no harder than programming a microwave oven.
Do breadmaking machines save you money?
You're probably wondering how much it costs to make a loaf this way.
It's impossible to say, really, because it depends on the exact ingredients you use. But
with the price of flour soaring and bakeries charging ever more for
their loaves, my guess is that a machine like this would easily pay for
itself in a year or two, giving you quite delicious bread at the same
time.
Who invented breadmaking machines?

You might be thinking breadmaking machines are a relatively recent innovation, developed in the last 20–30 years or so? It's true that small household breadmakers only became popular in the 1990s, thanks to companies such as Panasonic (a brand name of Matsushita Electric Industrial Co., Ltd. of Japan), who pioneered the one-loaf, home breadmaking machine in 1986. But if you think about it, breadmaking machines are obviously much older than this. The mass-produced sliced loaves many people eat aren't all produced by hand! In fact, mechanical breadmaking machines have been around since at least the early 20th century.
The earliest breadmaking machine I've found—the one shown here—was invented in 1903 by Sarah Stearns of Redlands, San Bernardino, California and patented the following year. How does it work? Flour (yellow) sits in a hopper at the top (green). When you turn the handles (gray) on the side, it rotates a paddle (orange) inside the hopper that sifts the flour through a mesh and down onto the rollers (turned by gear wheels). Dough passes between the rollers (red) on a sliding tray with flanges at the edge (darker red) supported by a sturdy frame (blue). What we have then is a really a dough-kneading machine; the handles (which work like levers) and gears help to make kneading far easier than it would be by hand. Probably if you had hundreds of loaves to prepare, something like this would save a huge amount of time. Unlike a modern breadmaking machine, it doesn't cook the loaves as well—and you still have to supply the energy for kneading by cranking those handles.
Artwork: A breadmaking machine invented by Sarah Stearns in 1903, taken from her US Patent 752,119: Bread Making Machine. Artwork courtesy of US Patent and Trademark office, colored and simplified slightly by explainthatstuff.com.
Find out more
On this website
Books
- Fresh Bread in the Morning from Your Bread Machine by Anette Yates. Elliot Right Way Books, 2003. A highly rated guide to using your new machine.
- The Breadmaker Bible by Karen Saunders. Ebury Press, 2003. Takes you beyond basic recipes to more challenging mixed loaves and breads such as crostini and stollen.
- Tips for your Breadmaker by Karen Saunders. Ebury Press, 2006. A beginner's guide that introduces your machine, shows you some basic recipes, then leads you on to more advanced loaves and doughs (for making such things as focaccia, pitta, and naan breads).
More from Explain that Stuff
Share this page
Press CTRL + D to bookmark this page for later or tell your friends about it with:
Cite this page
Link to this page
If you'd like to link to this page, thank you! Here's some code you can cut and paste:
More to explore on our website...