Earbuds don't last long—in fact, hardly any of the
headphones I've
ever bought have survived more than a couple of years. Why? Because the
cables almost invariably weaken and break through constant movement.
Some headphone manufacturers use more durable cables and reinforce the
places where the cables join the jack plug and the phones themselves
but, even with reinforcement, cables can still break sooner or later.
When this happens, most people furiously throw their headphones in the
trash and reluctantly buy another pair. But if you can use a soldering iron,
it's actually quite easy to repair them. Step-by-step, here's how...
Photo: An inexpensive pair of earbuds will usually fail sooner or later, either where the cable meets the phones or where it joins onto the jack plug.
Sponsored links
Please take care!
You'll need to use a knife or scissors, a burning match, and a hot
soldering iron.
Please take appropriate safety precautions with these hot, sharp, dangerous things, solder only
in a well-ventilated room, and so on. If you're a young person, ask an adult to help.
If your headphones are broken, you may not worry too much about taking a risk trying to repair them.
But be warned: it is possible (though unlikely) that you will damage delicate components in your headphones if you don't
solder carefully. Use a heat sink or apply the soldering iron for short periods of time to reduce the chances of heat damage.
It's also possible that if you don't repair your headphones correctly, you could damage any audio equipment you connect them to.
We accept no responsibility for any accidents, injuries, or disasters that result from your using the information here. You follow these instructions entirely at your own risk.
The items you will need
You will need the following, so have them ready:
Your broken earbud headphones.
A replacement jack plug (I tell you where to get this below).
A soldering iron and solder. (If you don't know how to solder at all,
try watching the five-minute guide to soldering by Collin Cunningham. If you do know but you've not done it in a while,
you can refresh your memory from the very short video
how to solder by Mike Allen.
For a more in-depth guide, try the
Adafruit Guide To Excellent Soldering.
If soldering is totally new to you, it's sensible to practice joining some old wires
together before you repair your headphones.)
A vise to hold things safely while you solder. (Or some bulldog clips, as I describe below.)
Some matches or a cigarette lighter.
A penknife, some scissors, or a wire cutter.
Sponsored links
Adding a new jack plug
Using a pair of scissors or a knife, cut off the old jack plug. Literally, just
cut through the wire as close to the plug as possible (because you don't want to
shorten your earbud leads unnecessarily). If it's a molded plug, throw it away—it's no use.
You will need to buy a new jack plug to replace it. Assuming you
are replacing one of the smaller plugs on a standard pair of headphones
or earbuds, the item you need is called a 3.5mm stereo jack plug and you can buy it easily
online from an electronic parts shop or from an electronics store if
you have one nearby. Make sure you get a stereo one; mono plugs look very similar.
If you're replacing one of the larger-style plugs (6.35mm or ½inch), these instructions still
apply, but you obviously need to buy a replacement that matches the size of your original plug.
The one I have here has a screw-on outer case and
a clamp at the top for securing the cable in place: it stops
you ripping the cables out of the plug if you pull on the lead too hard.
The clamp is a good idea unless you want to go through this
exercise again in a few weeks time! One quick point to note in passing: the replacement jack plug
will almost certainly be considerably larger than the molded plug you're replacing.
That's just unavoidable: the tiny plugs fitted to things like iPod earbuds in factories are soldered and
molded on by machines with "nimble fingers"!
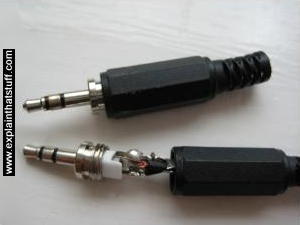
Photo: 1) A replacement jack plug like this is a fraction the cost of a new pair of headphones.
2) Unscrew the case and you'll see three terminals to which you'll reattach your cable. There are small holes in
the terminals through which you push the wires before you solder them in place. In theory, you can reuse a
plug like this over and over again just by removing old cables from it. In practice, it can be tricky
to get all the old solder off and the terminals snap off if you bend them too many times—so I'd
strongly suggest you buy a new plug instead.
Prepare your cable. A headphone stereo cable has two cables
running through it, one for the left channel and one for the right. These
are usually colored red and green. Each of these cables is surrounded
by copper wire (the ground). Strip the red and green cables back so you
have about a half inch to an inch of clean and shiny bare wire. Keep the red and green
wires separate, but twist the two sets of copper wire together—so you
have three wires instead of four.
Photo: The wires inside a stereo cable. Strip the cable back so you
have about 2.5cm (1 inch) of wire. Join the two copper ground wires together so you have three wires
instead of four.
Sometimes you will find earbud cables that are wired up slightly differently. One of the stereo cables
will have a red or green wire inside surrounded by ordinary, copper-colored wire. The other cable will
have green or red cable surrounded by red and green "striped" wire. In this case, the red and
green "striped" wire is your ground, equivalent to the copper-colored wire in the other cable. So you wrap that in with the copper-colored wire, giving you a red wire, a green wire, and a third wire that's a mixture of copper-colored wire and red and green wire. I hope that's clear.
Now strike a match and briefly heat the ends of
all three wires to burn off the insulating covering. It's usually some sort of
paint or plastic; try not to breathe in the fumes as you burn. If you don't do
this step, the wires won't make a proper electrical connection when you solder and your
headphones won't work. Don't burn too much though or you'll make the wires too
black and brittle. Let the flame play on the wire briefly (no more than a couple
of seconds or so) and then blow it out. When I say briefly, I mean briefly;
you're not cooking a steak! If your wires turn black and brittle, you've overcooked them and you'll
probably need to shorten the cable and start again. (You can keep shortening the cable, of course,
but don't get carried away or you'll make the cable too short to use comfortably.)
After you're done, you might find it helps to rub the wires very (very!) lightly with
sandpaper to remove any burned remains of insulation and so make an even better
electrical connection.
Unscrew the case of your jack plug and you'll see the three
terminals for the three wires in your cable.
Now, before you solder the wires, you need to thread the cable through the top (plastic) part of the plug (in other words, the cover) so it's ready to screw back on to the metal base afterward. It's very easy to forget this step—and if you do forget, you'll have to take the wires off again and repeat the process, which (believe me) is very annoying.
If you know how to "tin" the bare wires, it's a good idea to do that now. Tinning means you lightly
cover the bare cables with solder so they make better joints and better electrical contact. Here's a
good description
of tinning.
Also before you solder, remember the golden rule: soldering is not the same as welding. Solder is not metal adhesive: unlike welding, it's designed to make a good, reliable electrical connection, not stick two metals together. It is very important to make a good mechanical joint between the wires and the terminals (by poking the wires through the holes and wrapping them round a couple of times) before you solder.
At this point, if you wish, you can check your wiring. Put the earbuds into your music player and with the wires
touching the contacts, see if you hear stereo. You'll need to touch the wires very firmly to the contacts.
You may get "flickering" or crackly sound as you jiggle the wires on the contacts, but don't worry—that should
disappear when you solder them firmly into place. If you hear nothing, you might want to check that the wires are properly prepared, tinned, and connected the right way around.
Now you can go ahead and solder the three wires to the three terminals. The
copper-colored ground wire (shown orange in the diagram) goes to the large outer terminal (which often
joins to the cable clamp at the top). The green wire goes to the central terminal.
The red wire goes to the remaining terminal.
So, with a replacement plug like the one in the photos here, you'd wire it as shown below: the ground wire (orange) would go to the large
bottom terminal, the green wire would go to the terminal on the left, and the red wire would go
to the one on the right. (But note that your plug may have its terminals in a different position from mine!)
It can be quite tricky to support such a small jack plug while you're soldering it. But, whatever you
do, DON'T under any circumstances hold or touch the bottom of the jack plug while you solder the top of it: the heat will travel through the electrical pins in about a second and burn your fingers.
I know—I've made this mistake more than once! Either use a vise or some other method of holding the plug securely to an old table (for example, a large bulldog clip). You can improvize in all kinds of ways, but make sure
your new jack plug is completely secure and motionless before you think about soldering: if it moves as
you solder, or as the solder is cooling, you will end up with a "cold joint" (a poor and unreliable connection).
Photo: If you don't have a vise, you can impro-vise! I tend to use one or more large bulldog clips to clamp
what I'm soldering securely to an old worktop. The key things here are: 1) The item you're soldering needs to be clamped firmly so
it doesn't move when you touch it; 2) You need to make sure you have enough clearance around the item to get your soldering
iron in from below or the side. That's why I've used three clips here instead of just one; 3) You mustn't touch the metal clip holding the item you're soldering, because it too will absorb enough heat to burn you; 4) Solder may well drip down, and metal clips mark things, so don't do this on your best dining table.
If you get the red and green wires mixed up, your headphones will still work but
the left and right channels will be switched over.
Sometimes it can be hard to know if you've got this right. One way to check
is to listen to some music that you know plays certain passages or instruments mainly on
the left or the right channel with speakers or other phones.
(If Slash's guitar solo is in your left ear before you solder, you want it in your left
ear afterward as well.) Then check your work by listening to the same music with
your repaired phones.
If you really want to be sure about your stereo, you can check your left and right channels with this little sound tester I've made. You'll hear a short audio message at the start in both headphones. Then you should hear a plucked note only in the left headphone followed by a note only in the right headphone.
When your soldering is done, carefully place all three soldered wires inside the clamp at the top of the plug and crimp it tight with some pliers.
This protects the soldered connections and stops them breaking when you pull on the cable.
There's one, final tricky step. You may need to push all the soldered connections together toward the center so they fit snugly inside
the case when you screw it up again. It's important to ensure the three wires are well clear of one another when
they're soldered and pushed together. If they touch anywhere, you'll either lose sound in
one or both of the headphones or get mono instead of stereo. If you get that problem and
you can't fix it, try wrapping a small amount of insulating tape around or between the wires
so that, even if they touch, they can't make an electrical connection.
Screw on the top, test your headphones, and you should be pleasantly surprised!
If they don't work, how come? If you're confident your soldering was okay, the problem is probably that the newly soldered
wires are touching inside the plug. So unscrew the plug and try your earbuds with the cables eased away from one another slightly. If
they work now, you have to make sure the cables aren't being pressed together inside the plug. You can always use a little
insulating tape to keep them separate. Alternatively, you could cover your soldered joints with
heat shrinks, but it's a fiddly process on wires
this small and not something I have ever found it necessary to do.
If your soldering is at fault, you can always remove the cables and try again. Clean up the jack plug by melting the old solder off with the soldering iron, shorten your cable a little bit more, and repeat the process above.
Repairing by joining two broken pairs of earbuds together
If you happen to have two broken pairs of earbuds, you can often join them together to
make a single working pair—and it's a lot easier to do this than to add a new jack plug.
Suppose one pair has a broken jack and the other has broken earbuds. Simply cut the wires
of both pairs in half (or wherever you like) and join the working earbud section from one pair to the working jack section from the other pair.
Photo: Prepare and tin the wires before you twist them together, then solder.
You'll need to cut, strip, and prepare the wires as
I've described above, and you'll also need to match the wires from one pair of earbuds correctly to those in
the other pair (which can be tricky if they're different colors) before you solder.
You'll also need to cover the soldered joints with heat shrinks or insulation tape
to stop the bare wires from touching and shorting. As an alternative repair (along very much the same lines), buy yourself a headphone extension cable and solder that to your broken earbuds instead.
Photo: Solder isn't glue. Before you solder two pairs of broken headphones together, make sure you clean the bare wires and twist them tightly together to make a firm mechanical joint (one that doesn't easily pull apart). When you solder a joint like this, heat it from below and apply the solder from above so it flows into the joint like water soaking down into a sponge. After you've applied some insulation, you can reinforce the joint further if you want to: wrap some sturdy wire around it (such as a bent paperclip) then add more insulation on top.
The joints you create are likely to be quite vulnerable as you tug on the cable, and your repair may not last that long unless you reinforce the joint really well.
Fixing the cable at the headphone end
This is much trickier than replacing just a jack plug, but it's
essentially the same operation. Even if only one headphone or earbud is
broken, you should really cut the cable off both headphones or
earphones, shorten it by however much you need, and then repair both
phones. If you don't do this, you'll have one of the stereo wires
slightly shorter and carrying slightly more current than the other and
that can damage both your headphones and whatever they're connected to.
Exactly how you take the headphones or earbuds apart varies from
brand to brand. Take a look at our main article on
headphones for some reference photos that may help.
What if your cable has more wires?
Three- and four- wire headphone cables are by far the most common, but you might open yours up
and find even more wires inside; headphones with five or six cables are not unknown. If your headphones
have more than three or four wires, there are usually two explanations:
If you have a pair of ordinary headphones or earbuds and a five- or six-wire cable, the most obvious explanation is that some of the wires are not being used: for some reason, the manufacturers have used a multi-wire cable but only connected up three or four of the wires. In this case, you'll need to use a multimeter (or trial-and-error) to find out which of the wires you need to connect. With luck, you might be able to open up the earbuds or headphones at the listening end to find out which wires are connected where and carrying the sound signals; you can then figure out what you need to do at the jack-plug end. If you can't do that, because your headphones are molded or impossible to open, your options are more limited. The job is made harder by the fact that different manufacturers use different
(and entirely arbitrary) color-coding for their wires—so I can't, unfortunately, give any general advice. The best tip is to type "6 wire headphone cable" followed by the name of your headphones or earbuds into a search engine and hope someone has posted details on a forum.
Another situation where you might find more than three or four wires is if you're using a more complex headset
from a cellphone with a built in microphone or something like noise-canceling headphones. Unfortunately, this is another case where you'll have to rely on a multimeter and/or trial and error... or use your favorite search engine to
see if someone else has figured out how your particular make/model is wired.
Struggling to get it working?
Sometimes it's really hard to solder wires into tiny jack plugs and, with so little room to work in, you
may have to try two or three times to get the wiring correct. If you've tried a few times and you just can't seem to crack it, what else can you do? Joining two different pairs of earbuds together (as
described above) is a good option. Another option is to get yourself a much bigger (6.35mm or ¼inch) plug
and buy an adapter to use it with a 3.5mm socket. The connections on the larger plugs are much bigger and spaced further apart so soldering is far easier and usually more successful. Although this solution gives you quite a cumbersome plug (twice the length), it does at least save your prized headphones from the garbage can!
Photo: Using a 6.35mm plug and an adapter.
Thanks
Thanks so much to all the people who've sent feedback and suggestions to help me improve these instructions.
I hope they work for you too!
How to solder: Mike Allen from Popular Mechanics gives a perfect (1.5-minute) demonstration of soldering, covering essential points like getting the wires clean, making a good mechanical joint, and not disturbing the joint until it's properly cooled. This is exactly the right way to do it.
Soldering: Jonathan Hare of the Vega Science Trust shows how to solder a component to a circuit board and how to tin wire before you start. He also shows how to remove the insulation from a wire with a soldering iron (though as I explained above, I prefer to burn it off with a flame).
Collin's Lab: Soldering: Collin Cunningham offers a characteristically geeky introduction to how and why soldering works.
Books
How to Diagnose and Fix Everything Electronic by Michael Geier. McGraw Hill Professional, 2015. If you're feeling empowered and emboldened by a successful headphone fix, why stop there? Michael's book outlines the kind of test and repair tools you'll find useful, looks at how things are made and where they fail, and then runs you through common fixes for typical household gadgets, from audio amps to video players and laptops.
Troubleshooting and Repairing Audio Equipment by Homer L. Davidson. TAB Books, 1996. A more general guide that covers CD players, loudspeakers, amplifiers, and bigger bits of audio kit. Don't be put off by the date: analog audio equipment works in exactly the same way today as it did when the book was written.
Please do NOT copy our articles onto blogs and other websites
Articles from this website are registered at the US Copyright Office. Copying or otherwise using registered works without permission, removing this or other copyright notices, and/or infringing related rights could make you liable to severe civil or criminal penalties.
Woodford, Chris. (2008/2023) How to repair earbud headphones. Retrieved from https://www.explainthatstuff.com/howtorepairheadphones.html. [Accessed (Insert date here)]