Big companies sometimes make big mistakes.
When American inventor Chester Carlson (1906–1968) approached some of the world's largest
corporations with his idea for a photocopying machine, during the
1940s, they simply didn't want to know. They couldn't imagine who would
want to make lots of copies of documents. It took Carlson years to turn
the idea into one of the most important office inventions of the 20th
century—and those companies kicked themselves when they realized just
how big an opportunity they'd missed. Photocopiers look complex, but
they work using two pretty simple pieces of science. Let's take a
closer look inside!
Photo: The touchscreen control panel of a modern digital photocopier. Today's digital copiers are more versatile and easier to use than the largely mechanical, "analog" copiers that were popular until the late 1990s and early 2000s. They work
like more sophisticated versions of the all-in-one scanner/copier/fax inkjet or laser printers you may have at home than old-style copiers.
Have you ever tried that party trick where you rub a balloon on your
pullover 20 or 30 times? If you rub enough, you can make the balloon
stick to your clothes all by itself. What you see isn't magic: it's
static electricity. When you rub the balloon, you give it an
electrical charge. At the same time, you give your pullover an opposite
electrical charge. Unlike charges attract, so the balloon sticks to you.
Photo: Look, no hands! Static electricity can "glue" things together using opposite
electrical charges. This science is put to practical use inside a photocopier.
How does this happen? As you rub the balloon,
electrons (the
tiny negatively charged particles inside atoms that carry electricity)
move from your pullover onto the balloon. In other words, the balloon
gains more electrons than it should have and picks up an overall
negative electrical charge. Since the electrons have left your
pullover, it has fewer electrons than it should have and an overall
positive electrical charge. Now things with an electrical charge are a
bit like magnets. Two objects with an opposite electrical charge tend to
move toward one another, or attract, just like two magnets with
opposite poles. (Our article on static electricity
explains all this in much more detail.)
Sponsored links
What's light got to do with electricity?
Static electricity is one of the two scientific tricks that makes a photocopier work. Now let's
explore the other: photoconductivity.
If you believe what you read in science books, you probably think
light and electricity are totally different things. Light comes from
the Sun and powers things like flashlights; electricity flows round
wires and makes things like
vacuum cleaners and
refrigerators work. So
light has nothing to do with electricity, right?
Wrong! Light is
actually a kind of electricity. A ray of light is an ultra-fast
wave of electricity and magnetism wiggling back and forth and zapping
through space. That helps us to explain how solar power (making
electricity from sunlight) works. When sunlight shines onto a solar
panel, the solar cells inside
it soak up the electrical energy in the light and convert it back into an electrical current (flow of
electrons) that can be used to power something.
There's something similar to a solar cell in a photocopier and it's
called a photoconductor. Instead of producing an electric
current when light shines onto it, it captures the pattern of the light
as a pattern of static electricity. What use is this? Suppose you shine
a flashlight at your hand to cast a shadow image of a rabbit's ears on
the wall. But instead of shining the shadow on the wall, you shine it
on a photoconductor. Some parts of the photoconductor will be brightly
lit (where the light passes around your hand) and some parts will be
dark (where your hand casts a shadow). The photoconductor will gain an
electrical charge where it is light and no charge where it is dark. In
other words, it will have a kind of "electrical copy" of your hand.
This is the key to how a photocopier works.
Artwork: Selenium—the power behind early photocopiers—is a relatively
rare, semimetallic chemical element in the same group (16, formerly known as VI, VIA, and VIB) as oxygen and sulfur.
So what's this magic photoconducting material? Early copiers used
photoconductors made from a glassy (vitreous) form of the rare chemical element
selenium;
later ones used improved materials such as selenium telluride, which proved better
for high-volume copying. Selenium has been prized for its ability to turn light into electricity
since the 1870s, originally discovered by English electrical engineer
Willoughby Smith
and later developed by science professor William Grylls Adams, and his student Richard Evans Day.
Their work—marrying light and electricity—paved the way for
television,
photoelectric cells,
solar cells—and, of course, photocopiers.
Modern copiers have tended to dispense with selenium in favor of
photoconductive polymers (plastics).
Writing with light
“The need for a quick, satisfactory copying machine that could be used right in the office seemed very apparent to me—there seemed such a crying need for it—such a desirable thing if it could be obtained. So I set out to think of how one could be made.”
After a great deal of research and tinkering in his laboratory,
Chester Carlson figured out how he could use these two bits of
science—static electricity and photoconductivity—to help him make
copies of documents.
Suppose you want to copy a page from a book. If you shine an extremely
bright light on the book, you can make a shadow of the black and white
characters on the page, just like casting a shadow of your hand. If you
shine the light onto the page at an angle, it doesn't reflect straight
back: it bounces off at an angle. So, by shining the light at an angle,
you can throw a shadow of the page onto another object. Let's suppose
you put a photoconductor nearby and throw the image of the page onto
that. You won't create a shadow on the photoconductor—you'll make a
pattern of electrical charges: an electrical version of a shadow. Now
if we sprinkle ink powder over the photoconductor, toner particles will
stick to the charged areas of this "electrical shadow" like tiny little
balloons sticking to your pullover. All we have to do then is press a
piece of paper onto the photoconductor to lift the ink away. Hey
presto, the paper has a copy of the original page! This whole process,
which Carlson named xerography (combining two Greek words to mean "dry
writing"), is automated inside a photocopier and can happen over and
over again very quickly.
In case that's not clear, I'll go through it all again, exactly as it happens inside the copier,
in the box below.
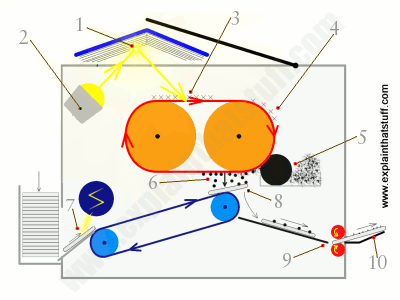
How a photocopier works
How a modern copier works
You place the document you want to copy upside down on the glass
An extremely bright light scans across the document. Much more light reflects off the white areas (where there is no ink) than off the black, inked areas.
An "electrical shadow" of the page forms on the photoconductor. The photoconductor in a photocopier is a rotating conveyor belt coated with a chemical called selenium.
As the belt rotates, it carries the electrical shadow around with it.
An ink drum touching the belt coats it with tiny particles of powdered ink (toner).
The toner has been given an electrical charge, so it sticks to the electrical shadow and makes an inked image of the original page on the belt.
A sheet of paper from a hopper on the other side of the copier feeds up toward the first belt on another conveyor belt. As it moves along, the paper is given a strong electrical charge.
When the paper moves near the upper belt, its strong charge attracts the charged toner particles away from the belt. The image is rapidly transferred from the belt onto the paper.
The inked paper passes through two hot rollers (the fuser unit). The heat and pressure from the rollers fuse the toner particles permanently onto the paper.
The final copy emerges from the side of the copier. Thanks to the fuser unit, the paper is still warm. It may still have enough static electric charge to stick to your pullover. Try it (but make sure the ink is dry first).
How Chester Carlson's original copier worked
What happens in a modern copier isn't so very different from the process that Chester Carlson originally designed.
We can see that by taking a look at one of the design drawings from his original photocopier patent. I've colored
and simplified the numbering to show roughly what's happening:
Artwork: Chester Carlson's original photocopier from his patent granted on September 12, 1944. Courtesy of US Patent and Trademark Office.
You insert the original document (to be copied) into a slot (green) at the top.
The document is carried into the machine by a belt and roller mechanism (dark blue).
A bright lamp (yellow) shines through the document and transfers an electrical shadow of it onto the photoconductor (orange).
The photoconductor is mounted on the outer surface of a drum (red), which carries the image past the toner hopper and brush.
Toner is now attracted from the hopper onto the charged parts of the drum.
You insert a blank sheet of paper into a slot on the opposite part of the machine. Carried inside by rollers (purple), it picks up the inked image from the drum.
A fuser unit heats, presses, and seals the image into the paper and the finished copy emerges.
As you can see from all the dozens of small numbers on the original drawing, this is a very simplified account of what's really happening—and all the parts and pieces that are involved. You can read a much more detailed explanation by taking a look at
Chester Carlson's patent, listed in the references below. Although technical, it's very readable and fairly easy to understand.
What's different about digital photocopiers?
Photo: This Hewlett-Packard all-in-one printer, scanner, and copier is the simplest kind of digital photocopier, though it's much less sophisticated than a full-scale office copier. It scans a document (with a built-in optical scanner) and then uses an inkjet printer to make a black-and-white or color copy. Unlike an ordinary scanner or printer, it doesn't need to be connected to a computer to make copies.
Copiers that work like this are essentially using analog technology: they scan an original document and reproduce it—using nothing more than optics and static electricity—as a faithful copy. From 1949, when
the very first Haloid XeroX photocopier went on sale, to the early 1980s, all copiers worked this way.
Everything changed in 1981 when Ricoh patented a crude digital photocopier. The first digital copiers from Ricoh, and later Canon, went on sale several years later.
Today, analog copiers are essentially museum pieces and most copiers work digitally: they scan a document
using an image-sensor chip (CCD or CMOS), create a digital version (typically a JPG or TIFF file), and then print that digital image in exactly the same way as an inkjet or laser printer. Since they scan very hi-resolution digital images, they can reproduce with the same resolution as a high-end laser printer (several times better than an analog copier). Once a document is in digital form, it's easy to enlarge or reduce it by any amount. Digital copiers also produce "cleaner" copies with better control of the image density and contrast than analog copiers.
Photo: A typical photocopier in a public library. This one is made by Gestetner and,
unlike many office copiers, doesn't have a sheet feeder built into the top (because it's primarily used for
copying books). The finished paper copies curl through the mechanism and appear in the empty space you can
see underneath. The drawers at the bottom hold spare paper.
You can really think of a digital copier as a combined scanner and printer, coordinated by a built-in computer; and, indeed, the popular all-in-one print, scan, copy, and fax machines you can buy for home offices work just like this, with separate scanning, printing, and faxing "modules" hooked together. They start with a digital image (either a document you've scanned, a fax from a phone line, or something received from a computer through a USB cable or wireless connection—Wi-Fi Direct or
Bluetooth), store it, and then print it. Some digital machines allow limited editing of documents before they're printed. Some let you save documents for printing again later (without the need to rescan them) on a built-in hard drive, flash drive, or SD card. Copiers with memories also make it much easier to duplicate complex, multi-page documents without the need to scan any of the pages more than once.
Although digital copiers are versatile, convenient, and inexpensive, there are some risks of using them in offices or other shared/public places. If they have hard drives, the documents they process are usually stored there, which can create a security risk: even when documents are deleted, recoverable traces can be left behind. Some copiers use encryption to get around this, while others take pains to erase documents from their hard drive more thoroughly and securely.
How a digital photocopier works
Here's one of Ricoh's original digital copier designs, taken from a patent they were granted in 1992.
I've colored it to make it a bit easier to understand and simplified the numbering.
Although there are dozens of intricate little bits and pieces, I'll just give the gist of how it works. If you want more
detail, you can dig out the patent for yourself (referenced in the caption below the image).
You place your document on the glass or, if it's a multi-page document, slip it into the document feeder (blue) on top.
A computer-style optical scanner (yellow) systematically scans a bright light across the document.
A digital image of the document is captured by an image-sensing chip (red) and the circuit it's wired into; in this case, the sensor is a charge-coupled device (CCD).
The scanned image is used to drive a laser and rotating mirror (turquoise).
The laser rescans an electrically charged version of the scanned image onto the surface of a photoconducting drum (gray, with original numbering "40"), in a similar way to what happens in a laser printer.
The drum picks up toner particles from one or more containers (gray) to create an inked version of the scanned image.
Guided by various rollers, a sheet of paper feeds in from one or more hoppers on the right and picks up the inked image from the drum.
The image is fused onto the drum by heated rollers (light green).
If a two-sided copy is required, the reversal unit (orange) flips the printed paper over and returns it to the mechanism for printing on the other side.
The finished copy emerges in the sorter section (green), which can be used to collate multi-page documents.
Photo: A modern Ricoh digital copier in one of my local libraries.
A brief history of photocopiers
Photo: A replica of Chester Carlson's original photocopier,
courtesy of US Library of Congress.
1876: William Grylls Adams and Richard Evans Day use a selenium-platinum junction to turn light into electricity, effectively building the first solar cell.
1938: Chester Carlson, working with a physicist friend, Otto Kornei, successfully makes the first photocopy using a zinc slide and a glass plate. He calls his idea "electrophotography," and is granted US Patent #2,297,691 the following year.
1944: Carlson develops a machine that can carry out his copying process and is granted US Patent #2,357,809, but he cannot find a company
to take up the idea. Some 20 big corporations (including IBM and RCA) turn him down before a tiny
nonprofit called Battelle Memorial Institute steps in to help.
1947: Carlson and Battelle join forces with a company called Haloid to sell xerography (as the process soon
becomes known) to the world.
1949: Haloid announces its first copier, the XeroX (the model A).
1951: Haloid releases the XeroX Model D, shown here. It has a camera unit (left) for making photographic plates and a developer unit for turning them into copies (right):
Photo: This early Haloid XeroX Processor Model D copier from 1951 betrays the invention's
origins: it looks distinctly like a photographic lab. There's a separate camera unit on the left and an image
processing unit for developing its plates on the right, which has three separate parts (a charging and image transferring unit, a developing unit, and a storage unit). It sounds–and was— a far cry from modern copying that takes mere seconds; this was a labor-intensive manual process that took 1–2 minutes to make a single copy. That's probably why the Model D was a commercial flop.
Photo courtesy of US Library of Congress, Prints & Photographs Division, HAER OHIO,25-COLB,38A--2.
1959: Haloid produces a much more user-friendly copier, the fully automatic
914, which becomes a massive commercial success.
On the back of this success, Haloid changes its name to Xerox in 1961.
1962: Xerox patents photoconductors based on selenium-telluride alloys.
1964: Carlson is named Inventor of the Year in honor of his achievement.
1970: IBM produces its Copier I, the first machine to use an organic polymer as the photoconductor.
1981: Japanese company Ricoh patents the first digital photocopier.
Professional photocopier troubleshooting and repair by Eric Kuaimoku. TAB Books, 1994. An older book, but still an excellent insight into the nitty gritty of how copiers
work. A good starting point for hackers trying to clean, service, repair, or revive decrepit machines!
Why Photocopiers Have Hard Drives by Jennifer Saranow Schultz. The New York Times, June 1, 2010. Multifunction copiers have hard drives to help them work on multiple print, scan, or copy jobs at the same time, but this can potentially pose a security threat if the machine stores sensitive documents.
History
The Story of Xerography: This 14-page history of how Chester Carlson invented the photocopier comes from Xerox Corporation. It's quite a large (1.4 MB) file in PDF format. [Archived via the Wayback Machine.]
Chester Floyd Carlson by Mark Crawford, The American Society of Mechanical Engineers, April 10, 2012. A short biography of Carlson and the story of his determination to find a market for his idea.
Oct. 22, 1938: Xerox This by Randy Alfred. Wired, October 2008. A short account of Carlson's 1938 breakthrough from Wired's "This Day in Tech" column.
Happy Birthday Xerox 914 by Clyde Farnsworth. The New York Times, August 9, 1985. An old (but interesting) article from the Times archive commemorating the world's first fully automatic photocopier, the Xerox 914.
Static pops pictures onto paper by Paul F. Ellis. Popular Science, January, 1949. An article from the archives showing how Popular Science described xerography to readers shortly after its invention.
Patents
US Patent #2,297,691: Electrophotography by Chester F. Carlson, April 4, 1939. This patent describes the basic scientific (electrical-photographic) process behind a photocopier.
US Patent #2,357,809: Electrophotographic apparatus by Chester F. Carlson, September 12, 1944. This later patent describes a machine that can copy documents automatically. It's the patent from which the drawing up above is taken.
US Patent #2,600,580: Electrophotographic apparatus by Edward R Sabel and Edward T Macey, June 17, 1952. Haloid edges toward a commercially viable copier in this patent, but the copying process is still largely a manual one.
US Patent #3,690,756A: Color xerography by William A. Smith, Xerox Corp., September 12, 1972. One of the earliest color photocopier designs, which uses three separate light images (scanned sequentially) and three separate colored inks.
Please do NOT copy our articles onto blogs and other websites
Articles from this website are registered at the US Copyright Office. Copying or otherwise using registered works without permission, removing this or other copyright notices, and/or infringing related rights could make you liable to severe civil or criminal penalties.